Hipstadventures: London

Last week I was in London on a short internship, and the weather was great (apart from Saturday when I got drenched in a freak downpour in Oxford Circus) so there were plenty of photo opportunities.

I saw that Hipstography was promoting a user-submitted combo, which turned out to be the G2 lens with the Robusta film. The photos provided to show off the combination were all taken in London with Oggl and looked great so I thought I’d try it out while I was there.

I was based in Bermondsey Street, near London Bridge and the Shard but was a bit nomadic so saw plenty of the city. On Friday I was offered a 12 week internship so I’ll have plenty of time to explore starting from Monday!

The G2 lens is great for warm contrasts, and the Robusta film has become one of my favourites – it has a gritty and dirty feel, with a slightly rough off-white border.

This combination is definitely one to remember for urban shooting.

Hipstamatic vs. Oggl

Back in May the people behind Hipstamatic Classic announced Oggl, promoted as “a community for creative people to capture and curate their lives through photography”.

Hipstamatic vs. Oggl - logos

Hipstamatic and Oggl app icons

As previously mentioned in the Hipstamatic vs. Instagram post, one of the main grumbles from some Hipstamatic users is that by setting the filter combinations before you shoot, you risk ending up with photos that just aren’t looking their best. Of course, that is part of the charm with Hipstamatic – you can wander around shaking your phone to randomise the gear and stumbling across a really good photo with a combination you’d never have chosen yourself – but there are those times when you just wish you could changed the lens or film afterwards.

Shoot first, ask questions later
Now, with Oggl, that’s one of the main features. Oggl is a camera-first app, so you take the photo and can then change the gear for different effects. It’s quite nice, knowing that you’ve chosen the right gear to produce the best photo possible. And compared with Instagram there are far more options and combinations as you can import your gear from Hipstamatic Classic.

Oggl capture screenshots

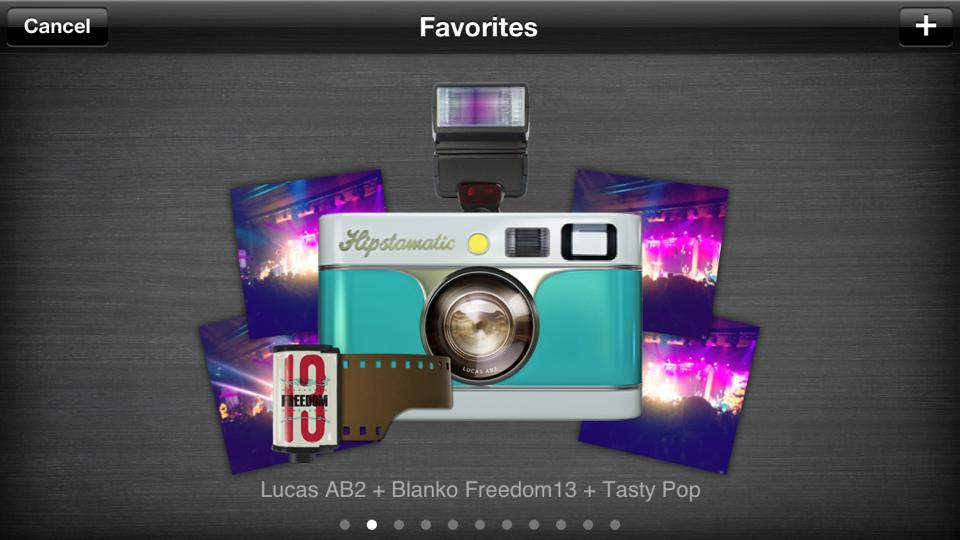
Oggl capture and edit interfaces

Another bonus working in Oggl’s favour is the option to shoot from the front-facing camera – making those all-important selfies far easier. I’m still not sure why Hipstamatic hasn’t included this in one of it’s updates, although I suspect that it’s to do with the low-res quality of the front camera, and also that it’d kind of betray the spirit of Hipstamatic – no cameras ever shot from the front and back, and selfies are a bit self-indulgent anyway… Besides, if you want to take a selfie, just double tap the viewfinder so it fills the screen, then you can turn the camera around and just tap to take a photo. It takes a bit of practice but isn’t too hard to get the hang of.

Oggl also makes use of the favourites feature, allowing you to choose specific lenses and films to save for situational photography. These can be named (sport, sunset etc.) and are easily selected from the main camera interface. There’s also the option to change the exposure and focus before you take a shot.

Share the love
Now onto the curate features. To rival Instagram, Oggl allows you to share your photos (you can share directly to Oggl from Hipstamatic) with other users, employing hashtags and creating user profiles. Other photographers can ‘love’ your shared prints and follow you if they like your style. It’s all very slick and well designed, clearly based around not just the photos but the photographers as well. I think in comparison to Instagram, Oggl feels a lot more friendly and intimate – it’s just a shame that the market is already so dominated by Instagram (now owned by Facebook).

Oggl curate screenshots

Oggl photo stream, profile and activity interfaces

In addition, you can connect your Oggl account to Instagram, Facebook, Twitter, Tumblr and Foursquare.

Pitfalls
Whilst Oggl certainly brings something new to the table and will no doubt entice a lot more people into the world of Hipstamatic (there’s a Windows phone version as well), it does lack some of the features that make Hipstamatic great.

Firstly, there’s no software flash, meaning that there are no more Dreampop light leaks or silvery tints from Tasty Pop. Flash is simplified to on or off, using the hardware flash. And then there’s the portrait orientation, which makes it feel like you’re using a phone rather than a camera.

Additionally, the app interface is very functional – there are no quirky design elements that invoke nostalgia for toy cameras, no camera cases just for the sake of being able to change the look… It’s a bit more simple and practical, and due to being able to change the photo effects afterwards, it’s fairly idiot-proof.

This slideshow requires JavaScript.

In summary, I’m starting to find myself using Oggl instead of Instagram – when you’re low on time or not sure what gear combo to use, it’s easy to snap a photo and mess around with the affects afterwards. Hipstamatic Classic requires a bit more skill, time and patience, and I think that switching between the two apps will make the heart grow fonder for it.


Hipstadventures: Lake District, Pt. 1 – São Paulo style

I’ve just got back from a short family camping trip in the Lake District. We stayed for two nights at Waterside Farm Campsite on the edge of Ullswater, just by the small village of Pooley Bridge.

My parents bought a 1973 VW Camper last summer, and have spent the last year doing it up, so we booked a little family time away – the five of us plus three dogs.

Gus the Bus

Gus the Bus – Hornbecker/Robusta/no flash

Internet signal was terrible, weather was mixed and three dogs in a tent was interesting, but I got a few good snaps on my Hipstamatic. I tried to experiment with a few lenses and films that I’ve not given much time to before, and some of the results surprised me.

São Paulo HipstaPak screenshot

The São Paulo HipstaPak, released in June, came with the Madelena lens and Robusta film – bringing some Brazilian warmth to our British summer. Previous attempts with the Madelena left me unimpressed – in low light scenarios the lens can dominate and ruin photos, making detail in dark areas indistinguishable. The film is actually quite nice – a semi-messy white border that doesn’t interfere with the effects of whatever lens you’re using.

Having tried using the Madelena in a variety of situations, I think the key is to make sure that whatever you’re shooting has plenty of light. If there are large areas of dark objects or shadows, you’ll lose any definition to them.

The Lake District and Brazilian-inspired gear sometimes make an unusually good match – see below!

I’ll be sharing a few more of my photos from the weekend in a future blog post – John S did it again!

Combination Conundrum

With so many combinations possible, sometimes it can be really hard to know which lens, film and flash to choose in any given situation – particularly when you don’t have much time. That’s where the favourites option comes in handy, so you can easily select those tried and tested combos.

Favourites screenshot

Save your favourite combinations to make life easier

To work out your favourites, you might want to just spend a while snapping away, trying different lenses with different films and hoping some of them will come out OK… Or you can try a tool like Hipstamatrix.

Ben Gremillion and Cherie Benoit designed Hipstamatrix to allow you to preview what effects different combinations have, depending on what sort of shot you’ve got in mind. Some of the more recent gear is missing, and there are a few inaccuracies with things being mislabelled, but it’s still a useful tool for beginners.

For instance, if you wanted a colour photo with cool tones and a light messy border, Hipstamatrix gives you 17 different options.

Hipstamatrix screenshot

Use Hipstamatrix to work out possible combinations for the effect you’re after

My advice is to not spend too long trying to work out what combinations might work well, because there are so many factors to take into account. Sometimes the best thing to do is just get out and have a go, but be prepared that not all shots will come out looking just the way you want – it’s all part of the learning curve! For safe shots the Hornbecker lens is a fairly good bet, teamed with any of the more subtle films, such as one of the Blankos.

Hornbecker/Wonder/no flash

Hornbecker/Blanko Noir/no flash

Do you have any fallback combos that never let you down? Let me know – send in a photo and I’ll try to feature it in a future blogpost.